
This is the manual for Screwfly Studios' new game, Deadnaut.
Send all feedback to support@screwflystudios.com
Deadnaut is complex, hard to master, and strategically subtle. It can be punishing at times, and should you lose your crew, the results are final. No reloading.
But the campaigns are short and tight. They can be finished in an hour, provided you last that long. And if you don't, then it's easy to jump back in: your custom crew is still there, ready for another adventure. Or you can just fire up a new campaign and let the game build a crew for you.
You aren't a disembodied, godlike controller. You are sitting in the cockpit of a small exploration vessel remotely issuing commands to your squad of Deadnauts as they explore a floating ghost ship.
This link between you and your Deadnauts is sketchy at the best of times. But it can be further disrupted by the security system of the ship your Deadnauts are investigating.
Much of Deadnaut's design revolves around mystery. You never know what you're up against. Every mission has your Deadnauts arriving on a derelict. They, and you, have little knowledge of the layout or the enemies. As you progress through the campaign, your Deadnauts will gather information. This info can be used to help make decisions, and it's also quantifiable - trade your knowledge to upgrade your gear.
But you - the player - are not always given the information you might want. Your cockpit is not a slick, omnipotent machine that mystically reveals all. It has limitations and it can be vulnerable to attack.
Mastery of the game requires understanding the information you have, looking for hints, adapting to new situations, and hedging your bets. There's never a clear path.
Deadnaut may appear similar to other games, but it does many things differently.
There are few finite resources in the mission. Your Deadnauts have unlimited ammunition, they can use their stims as they please, they can hack whatever they want. When you buy some technology on the market, you can replicate as many as you need.
Instead, there are consequences. Blasting rockets around will damage the ship - do it too often, and the whole vessel will explode, killing everyone on board and ending your campaign. Stims might sound like a good idea, but they cause withdrawal when they wear off. And the next time you use it, the bonus is shorter and the withdrawal longer...
Many aspects of the game are obvious - the pros and cons of using a blast weapon over a beam weapon are fairly clear. But there are many systems grinding away underneath that have subtler effects. For example, a Deadnaut's 'stability' wave may not seem like a big deal, but it can impact many activities.
Pay attention to the environment. The ship your Deadnauts are investigating exerts a lot of influence over the mission. For example, it distributes power to various subsystems, which can make your Deadnauts more visible, increase or decrease the health of enemies, or dramatically alter the ship's security systems. The ship is also falling down around you and being in a heavily damaged room can cause injuries.
The game features many 'roguelike' qualities. Levels, items, ship logs and enemies are dynamically generated, which adds a lot of variety. It also features 'permadeath' - when your crew is wiped out completely, the game is over and you can't reload.
As long as you have one crew member alive at the end of the mission, you'll be able to move to the next. You can also clone any deceased Deadnauts between missions.
This guide will help you knit together a strategy. And then, when everything goes wrong and it all falls apart, it'll help you figure out ways to adapt.
But remember: there's no right way to play. Have fun, experiment.
You have a crew of five Deadnauts. Maybe you crafted them yourself, or perhaps you rolled the dice and jumped straight in with an allocated crew. Either way, spend a few moments getting to know them.
By default, you can press 'Q' to look left and view the character screen. You can also move your mouse cursor to the far left of your view, at which point you'll see a light-blue glow. Left-clicking while this glow is visible will reveal the character screen.
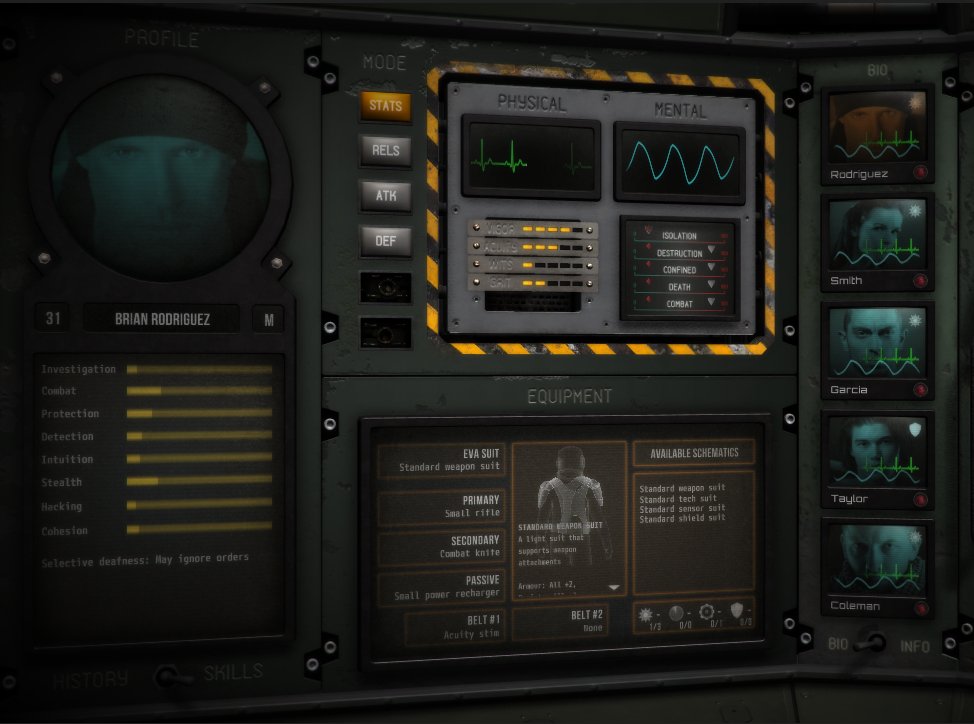
What skills do they have? You'll generally want to think about their immediately useful qualities: combat, protection, detection and hacking.
As you become more familiar with the game, you'll want to explore other skills, such as intuition and investigation. Later, you'll also want to think about relationships, stability and flaws. But those are more advanced systems and you've already got a lot to think about.
What do we know so far about our mission? Press 'E' to look right and click the Campaign button. As before, you can move your cursor to the far right and click to see this screen.
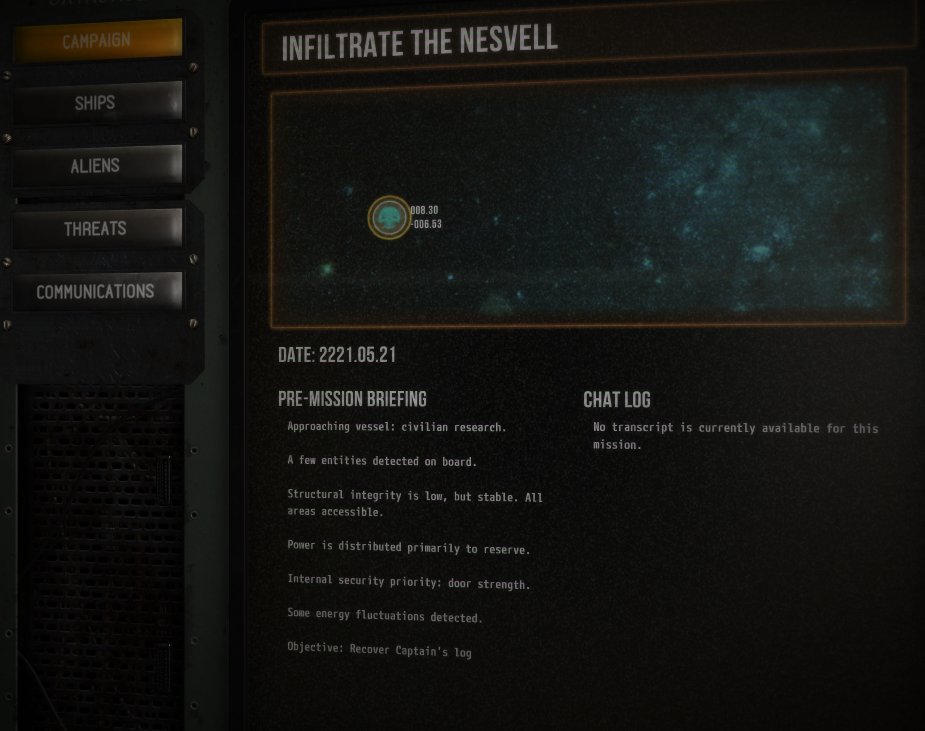
The briefing will give you some hints about the ship, as well as your mission goal. In this case, we need to find the Ship's Log, which is located in the Bridge.
If you want a more thorough breakdown, click Ships.

The important thing here is we know roughly how the ship is distributing its power. We know it's prioritising reserve power - this is good news, because the crew can tap into the ship's reserve power when using some weapons and equipment.
The other important thing to note is the Security breakdown. Although the ship isn't diverting much power to security overall, we can see that doors and sentinels are getting the most attention.
This information is crucial. If the ship were, say, distributing a lot of power to life support or security, then it might dramatically change how we approach the mission.
Let's recap. Our mission is to retrieve a Ship's Log. We're not required to kill anything or investigate corpses - we just need to get the log and leave.
We know roughly what the ship might throw at us. We won't need to worry too much about running out of power, and the security system isn't too dangerous. But it would be handy to have some kind of hacking capability.
With that in mind, check out your crew. Look at the equipment you have available and look over your crew's stats.
Just because your crew has a certain set of skills, doesn't mean they're always useful. For example, our crew doesn't have a dedicated hacker, but hacking might be useful to help deal with those tricky doors. So let's equip one anyway.

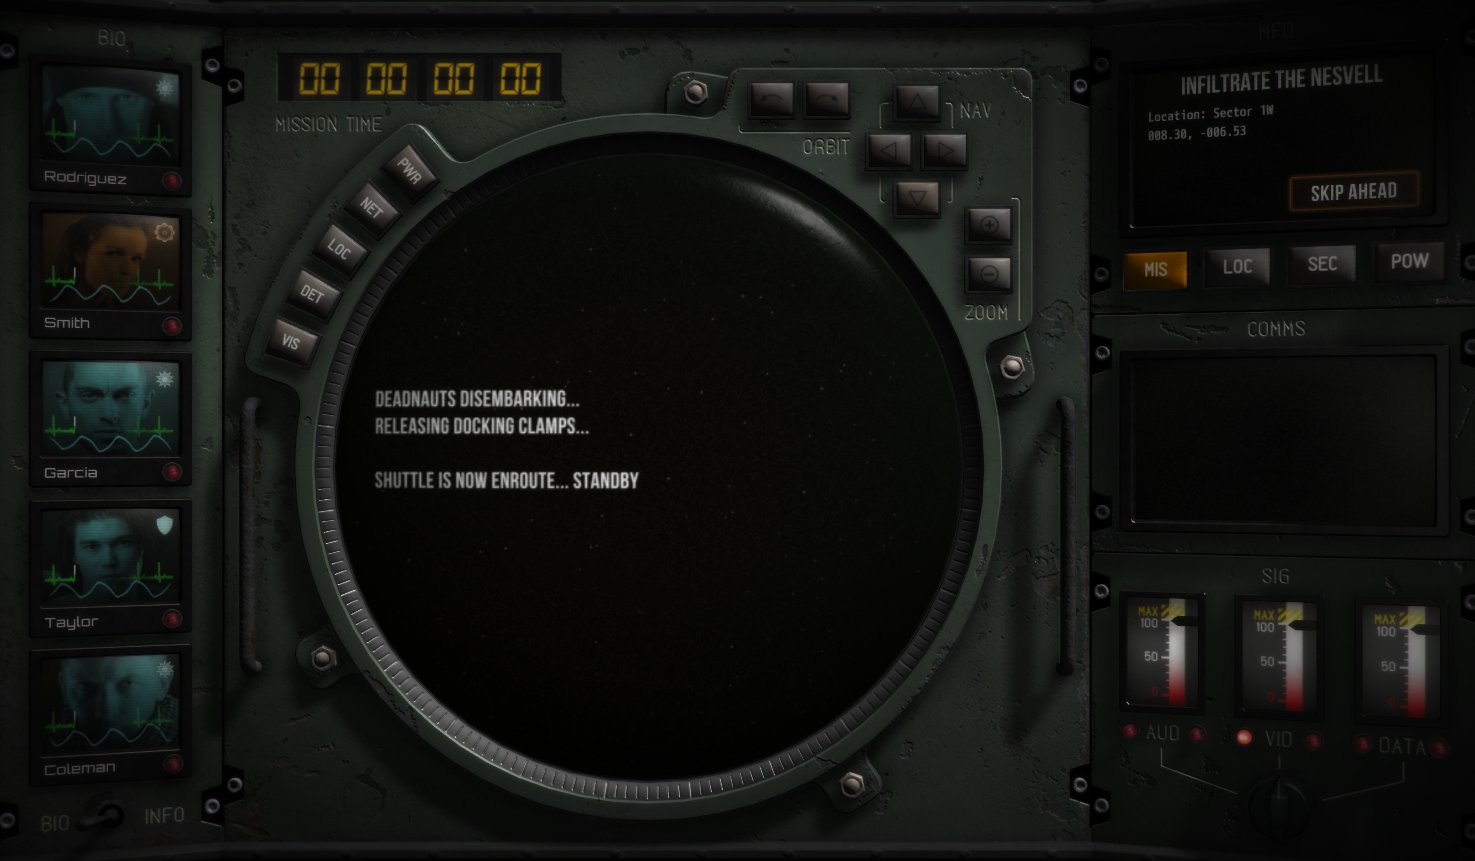
With everyone equipped (all Deadnauts must have a suit and a primary item), go back to the main console, click the MIS button on the top-right display and press Deploy Deadnauts.
Have a look at your Deadnauts. Are they getting along? Right-click the portraits (or flip the BIO switch at the bottom of the portrait screens) to see if there are any active effects.
If you have an uncooperative group, then all their skills will drop. Check out the relationship panel on the character screen to see if someone's bringing down the group. If so, maybe you can separate them from the rest?
It's not uncommon to split a group with a negative penalty into two groups, and have both groups gain bonuses.
Investigate any corpses you see in the starting room. At the very least, this will increase your Knowledge score, allowing you to purchase more tech at the end of a mission.
Before you open that first door, take some precautions.
And don't forget about Watchers. They do two things: first, they dampen the signals going to and from your Deadnauts, making it hard to issue orders or see what's happening.
Second, they'll try and revert the ship back to what it was before you arrived. If you've opened a door, they'll close it. If you've hacked a sentinel, they'll seize control of it.
In this case, let's say you open the door and start moving your crew into the next room. What would happen if a Watcher suddenly closed the door, isolating a Deadnaut in a room with hostiles?

Never underestimate Watchers. They can quickly ruin your day.
Finally, check the other instruments on your panel. Scroll through the MFD in the top-right. The MIS screen will show you whether you've completed an objective, and importantly, whether you can extract your Deadnauts. You'll also want to check the LOC panel to see how damaged the ship is - if the overall structural integrity drops below 10%, the ship will explode.

And remember to watch your signals. If a channel is being targeted by a Watcher, turn the dial to boost the signal.
A good thing to keep in mind is that it's highly likely you'll be killed by whatever's on the other side of a door.
Before you engage an enemy, ask yourself a few questions.
Does it shoot from a distance? Does it have any vulnerabilities? Is it fast? How can I kill it?
You won't know all this information at first. But you can always get a rundown on the enemy on the Threats panel in the Library screen.
My Deadnauts have had a few scrapes with the enemy and have collected some information. We can see, for example, that it only does melee damage. But, disturbingly, they can also drag a Deadnaut to another location.

So, if we can keep our distance, we might be ok. And I also know that if a field is being cast on a Deadnaut, then they can't be dragged - better keep my field-equipped Deadnaut nearby.
Some enemies can be killed on the spot, others might require some special conditions. Above, you can see this particular enemy is attached to some kind of totem, meaning I'll need to destroy those first.
At some point you'll need to attack it directly, either to kill it outright, or just defend yourself. The Threats panel may also show any particular resistances it has. If it's highly armoured against ballistic weapons, then perhaps you should get your axe-wielding Deadnaut to take it down.
You may not have an opportunity to prepare. But if you do, there's a few things you could do.
Many things can go wrong. Here's a selection:
It's possible that this is the end of your crew. But before you throw in the towel, you might have some options
Remember, you only need one Deadnaut to finish the level. You can always clone the others and bring them back to life.
The Deadnauts have reached the Bridge computer and downloaded the ship's log.

Once you've completed the objective, you'll need to make it to an escape hatch. Once all your Deadnauts are there, you can extract them.

You've completed the first mission, but your next mission will be tougher. So before you dive in, visit the Communications panel and purchase some equipment. Once you've purchased something, it'll be available to all Deadnauts.
But don't just buy something because it sounds good. Look at your next mission briefing - do you know what you're up against? Maybe there's an attribute about the enemies you can exploit? Or perhaps you want to buy a clone of a deceased Deadnaut?
There's no right answer. But if you plan well, then you'll have a fighting chance.
Deadnaut is a challenging game of tactics, planning, strategy and luck.
It has a simple premise. Take a crew of five Deadnauts - mercenaries, looters, fighters, hackers - and explore the ghost ships drifting aimlessly throughout the galaxy.
They're not all lifeless. Some are full of murderous crews and genetically enhanced soldiers; others are occupied by spectres and monstrous entities. And at all times, the ships' security systems are watching, ready to lock onto your signal and disrupt your communications.
Your Deadnauts are not always compliant. They can get injured or frightened, and they have needs and motivations that affect their performance. But if you can shepherd them well enough to complete your objectives, you'll unlock new technologies and upgrades.
Remember: be vigilant, listen to your crew and stay in control.
If you've played Zafehouse: Diaries, you might notice some similarities. But Deadnaut is a very different game in many ways.
As in Zafehouse: Diaries, your team starts the game with varying positive and negative relationships. In Deadnaut, these relationships are fixed. However, they can vary temporarily.
The crew roster contains all custom made Deadnauts. Unlike ZD, you have more control over character generation, and you can also influence - though not guarantee - the team's starting relationships.
Every game consists of four missions. Your Deadnauts, items and knowledge will persist throughout the campaign.
If your crew is completely wiped out, the game is over and you cannot reload the game. However, so long as you have at least one crew member alive, you'll be able to clone any dead crew members - at a cost.
In ZD, the diary contained hints and clues about what was going on around you. In Deadnaut, you have access to far more information. Primarily, you can see where your crew is, who they're attacking, which weapons are being used, and so on.
However, there are many elements in the game that you can't see through your limited ship scanner. Fortunately, your Deadnauts are talkative and they'll let you know if something interesting is happening.
In Deadnaut, your goal is to complete a campaign comprised of four linked missions. Locations, items, aliens and enemies are dynamically generated, meaning no two missions are the same.
To leave a location, and therefore complete a mission, your Deadnauts will have to satisfy a main objective. This appears on the MFD screen on the MIS panel. Some objectives are straightforward extermination missions, while others may involve investigation and exploration.
In all cases, you must reach an evacuation point, signified by a blue hatch. There is always an evacuation point in the room you started in. Some Deadnauts may use their intuition to discover more.
If your crew is wiped out, the game is permanently over. There are no reloads, and no undos.
However, so long as you end a mission with at least one living crew member, then you can clone any deceased Deadnauts.
Your dashboard is a complex piece of machinery. It allows you to scan a ship from a distance, track your Deadnauts, expose threats and issue orders.
But it's not perfect. The information you see can be distorted by external security systems - called Watchers - that lock onto your Deadnauts and attempt to block the signals.
If you don't take measures to block the Watchers, then your dashboard can turn against you, hindering orders, corrupting data and blocking your view.
Deadnaut is best played with a combination of mouse and keys:
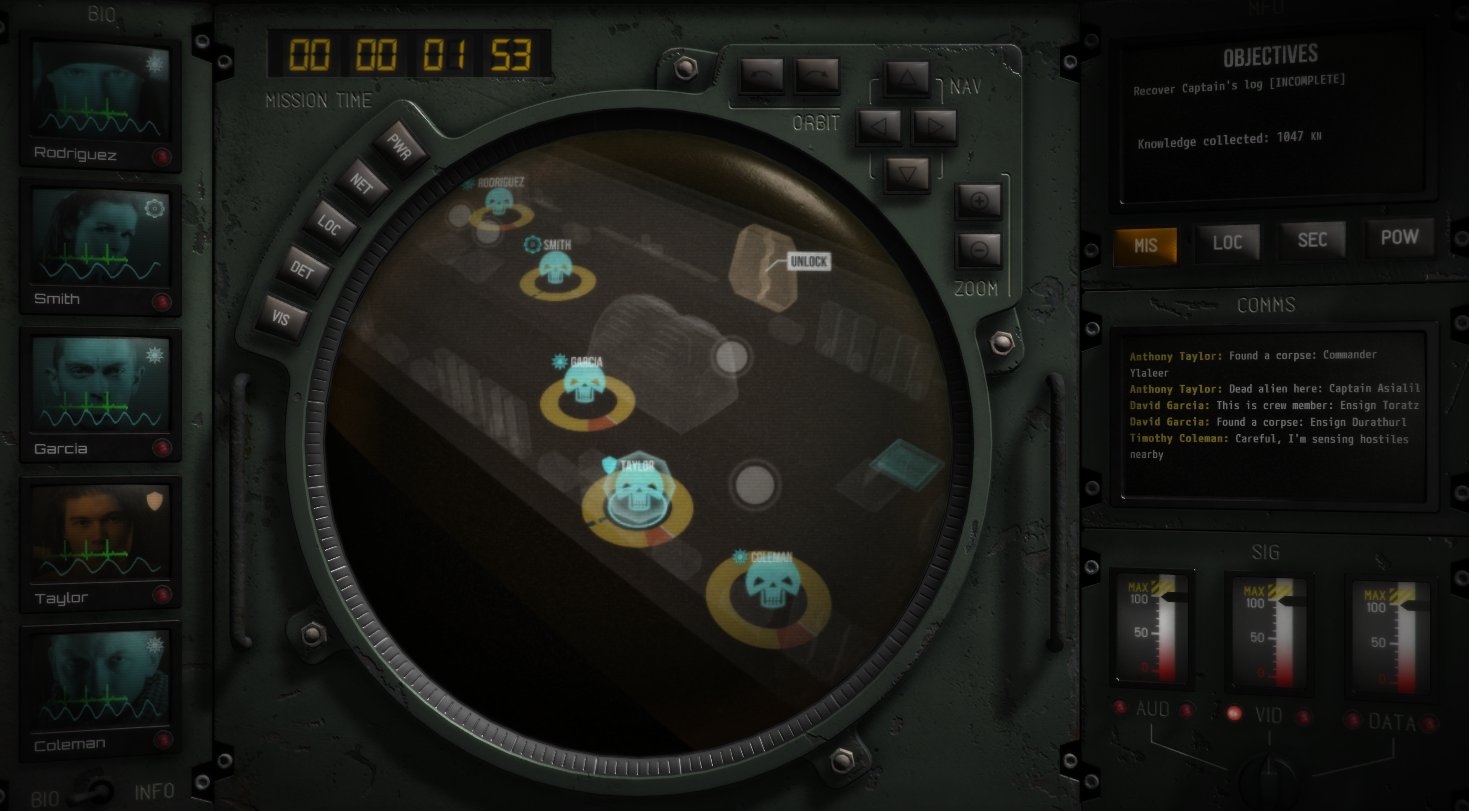
The main console contains the viewport, Deadnaut profiles, MFD, comms and signals.

This visually represents what's happening on the other ship. Your Deadnauts will reveal rooms and furniture as they encounter them. They will also reveal threats, provided the Deadnauts can detect them.
The buttons on the upper left of the viewport can show or hide information.
The viewport can be controlled via the buttons on the upper right:
By default, you can use WASD to pan the camera; scrollwheel up and down to zoom; and Z/X to rotate.
Deadnauts are controlled exclusively through the Viewport.
To issue an order, you must select one or more Deadnauts.
Select one or more Deadnauts and right-click on a free spot. Deadnauts will try and find the shortest path.
Select a Deadnaut and right-click on an enemy or Sentinel.
Your Deadnaut will attack with their best and safest weapon. Typically, this will be the primary weapon or a side-arm weapon. However, if the Deadnaut has a primary weapon that does explosive damage, then they will attack with their side-arm pistol if available.
Middle-click to active the special ability in a Deadnaut's primary item. These include:
You can also hold down Control and left-click to use these abilities. Letting go of Control before clicking will cancel the action.
To interact with doors and other objects, select a Deadnaut and then click the corresponding tag in the Viewport. If multiple Deadnauts are selected, then the most skilled Deadnaut for the task will be the one to perform the action.
The portraits show your Deadnauts. Clicking a portrait will open a communication channel, which lets you issue orders.
When the channel is open, the red light will glow. When the Deadnaut is speaking, the red light will flash. You can see what they're saying in the chat log.
The green heartrate monitor represents each Deadnaut's current health. It will gradually change colour to red and increase in speed as a Deadnaut becomes injured.
The blue wavelength represents a Deadnaut's relative stability. The more erratic it is, the less stable they are.
Portraits also have a secondary mode. Right-click on a portrait to show what bonuses or penalties are being applied, or flip the switch at the bottom of the portraits.

The MFD, or multifunction display, gives you a quick snapshot of your progress and the location.
The Comms panel stores a log of all Deadnaut chatter. You can also find a full transcript on the Library console in the Campaign section.
Your ability to command the Deadnauts is influenced by the signal strength. If there are no Watchers or disruptions to the signal, the strength will be high and you won't have anything to worry about.

But if the signals degrade, you'll struggle to stay in control.
Your signals will slowly improve if there are no active Watchers. You can also boost a signal by rotating the dial to the associated signal gauge.
The crew console gives you detailed information about your Deadnauts and their relationships, backgrounds, strengths and weaknesses.
At any time you can select a portrait to focus the crew console on a Deadnaut.
The photo, name, age and gender of the selected Deadnaut.
Select a panel by clicking the buttons on the left.
View currently equipped items here. If you haven't deployed your Deadnauts, you can also add or change their equipment.
To add an item, first select the slot - suit, primary, secondary, passive or belt. If there's already an existing item, right-click the slot to remove it, or click the small 'X' in the slot's top-left corner. You can then select an item from Available Schematics.
You can only equip an item if your suit has enough attachment ports available for that item.
The library console lets you explore the information you've collected, as well as purchase schematics for new items and clone deceased Deadnauts.

You command a crew of Deadnauts, so named because they rarely make it back to Earth. They each have their reasons for signing up - glory, escape, fear, penance - and they all have something to offer.
Some are experienced soldiers, others are master hackers. Some have been exploring for years and have developed a special intuition for this kind of work.
But there's no guarantee they'll work together. They don't have to like each other. They don't have to like you. They're not a well-oiled combat machine. They might be unstable and they have their flaws.
Although there are no character classes, your Deadnauts will generally fulfil of one of four general roles.
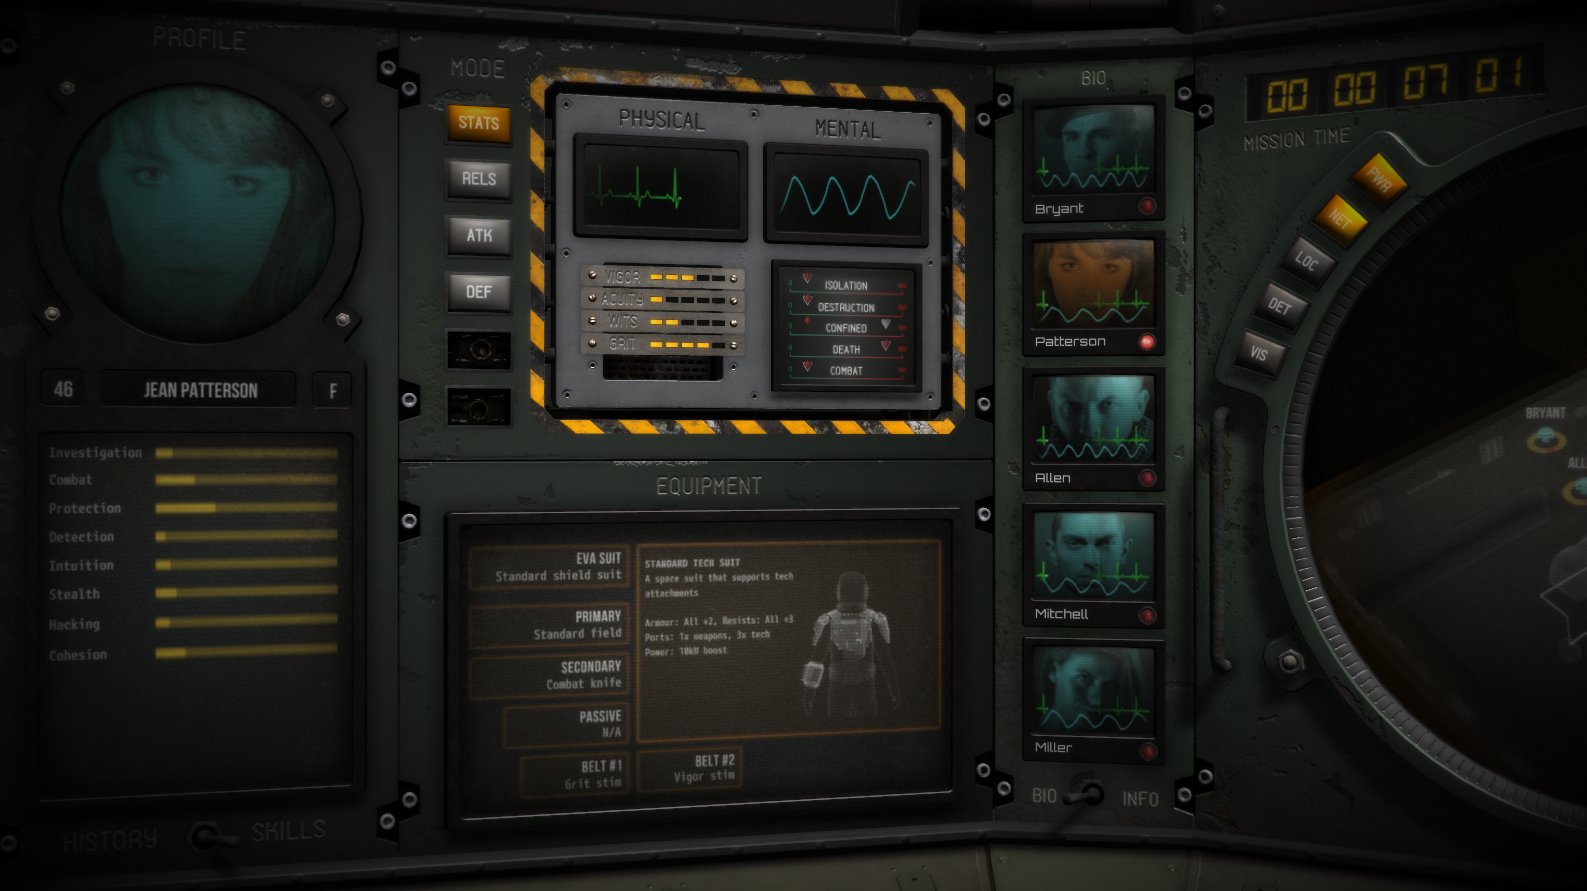
Deadnauts have the following fundamental attributes
Attributes are generally fixed throughout the game. However, they can be manipulated briefly using special stimulants. Be warned: when a stimulant wears off, the Deadnaut will go into a withdrawal phase and take penalties.
Skills represent a set of abilities, typically related to a Deadnaut's history.
Deadnauts may have flaws. These are special periodic events that may be triggered in certain circumstances.
Any flaw effects are temporary. For example, Deadnaut relationships that have dropped because of a Bad Vibes event will return to normal after a short period.
All Deadnauts work well in some situations, and poorly in others. When they're in a preferred environment, they'll fight better, hack faster and generally perform better in everything they do.
Every Deadnaut has either a positive or negative preference for the following categories:
You can alter these preferences during the Childhood phase when creating a new Deadnaut.
If a group of Deadnauts in close proximity are moderately or highly stable, then they'll receive a 'Stable formation' bonus. Deadnauts in a stable formation will move at the same speed and detect enemies faster. They can also receive a special bonus to damage if they concentrate their fire on a single enemy.
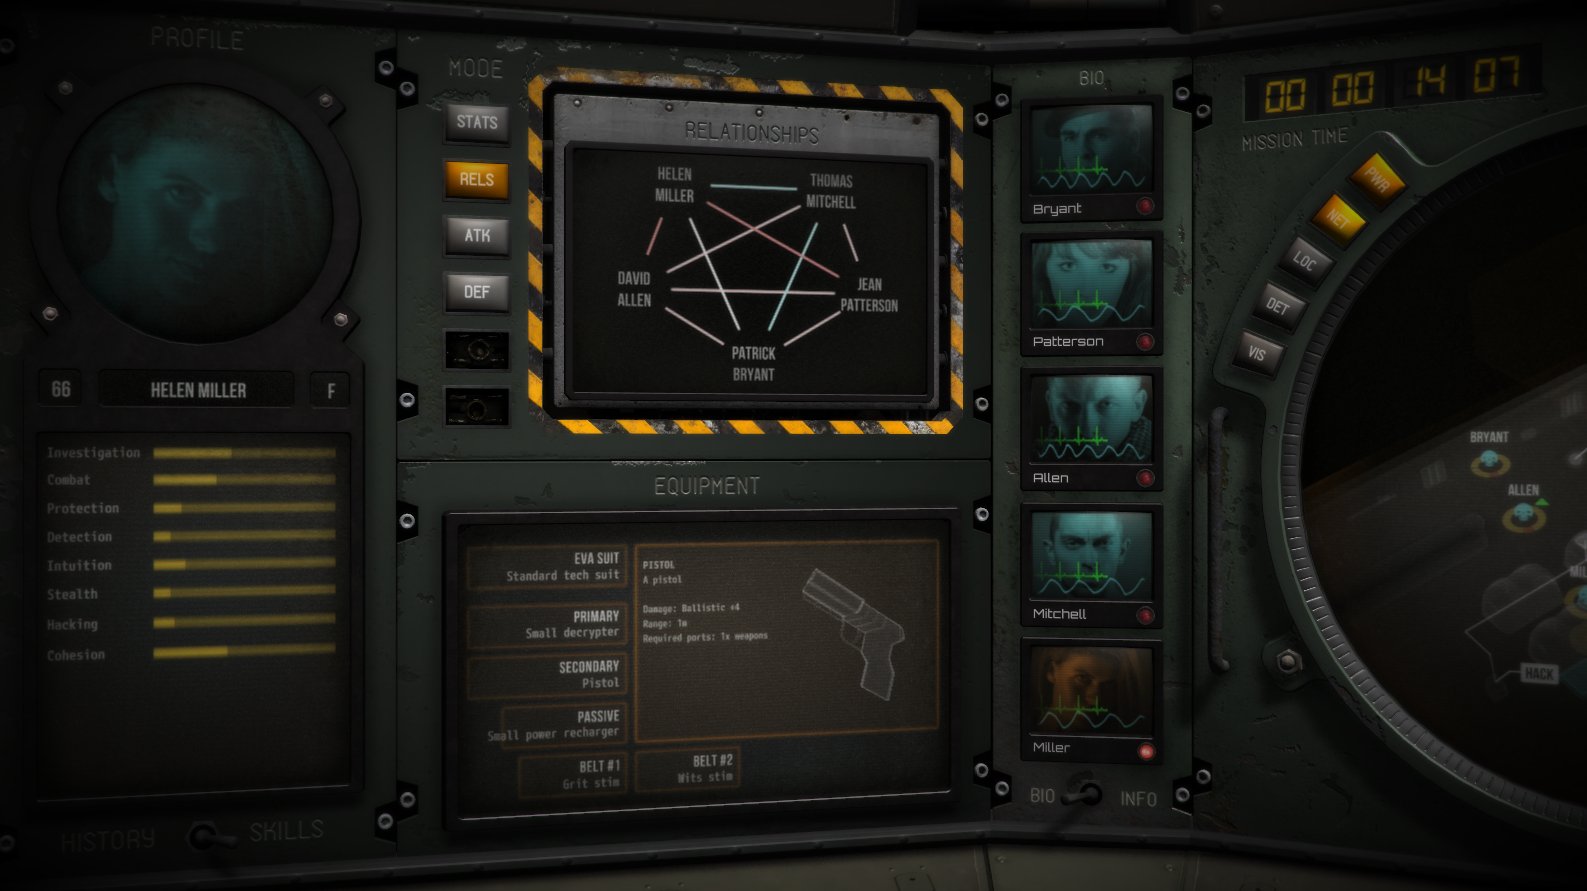
Your Deadnauts start every campaign with a (mostly) fixed set of positive and negative relationships. Relationships can be influenced during character creation by choosing to make a Deadnaut likeable or unlikeable.
Relationships have a constant influence on Deadnauts. If a Deadnaut is near one or more people that he or she gets along with, then they will receive a boost to all skills. However, if Deadnauts don't get along, then they will receive a penalty.
There are several ways you can influence relationships:
Penalties or bonuses are always temporary and do not persist between missions.
Deadnauts that have a good relationship are more likely to help each other in combat. This behaviour persists as long as there is a positive relationship between two Deadnauts.
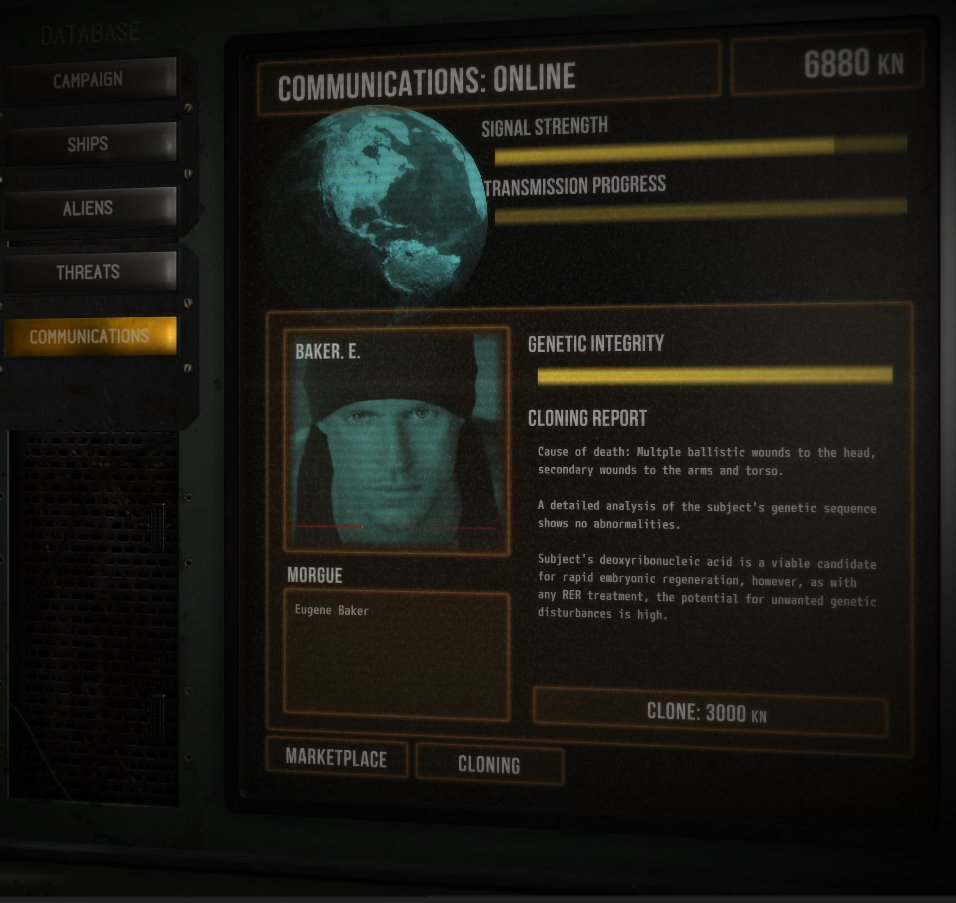
When a Deadnaut dies, you can revive them after the mission. It can be expensive, and the cloning process isn't perfect, but it might just get you through the campaign.
To clone a Deadnaut, select 'Cloning' on the Communications screen, select your Deadnaut, and the press 'Clone'.
The ships you encounter once had a crew. While you don't know much about the aliens, you know they were similar to humans. Like us, they left their homeworld and started expanding their borders.
And just like us, they were curious.
Every campaign is built around some kind of mysterious event that happened to the aliens. Some aliens may have opened a portal to another dimension, another species may have conducted experiments on its own people. Whatever the cause, it always led to the crew's demise.
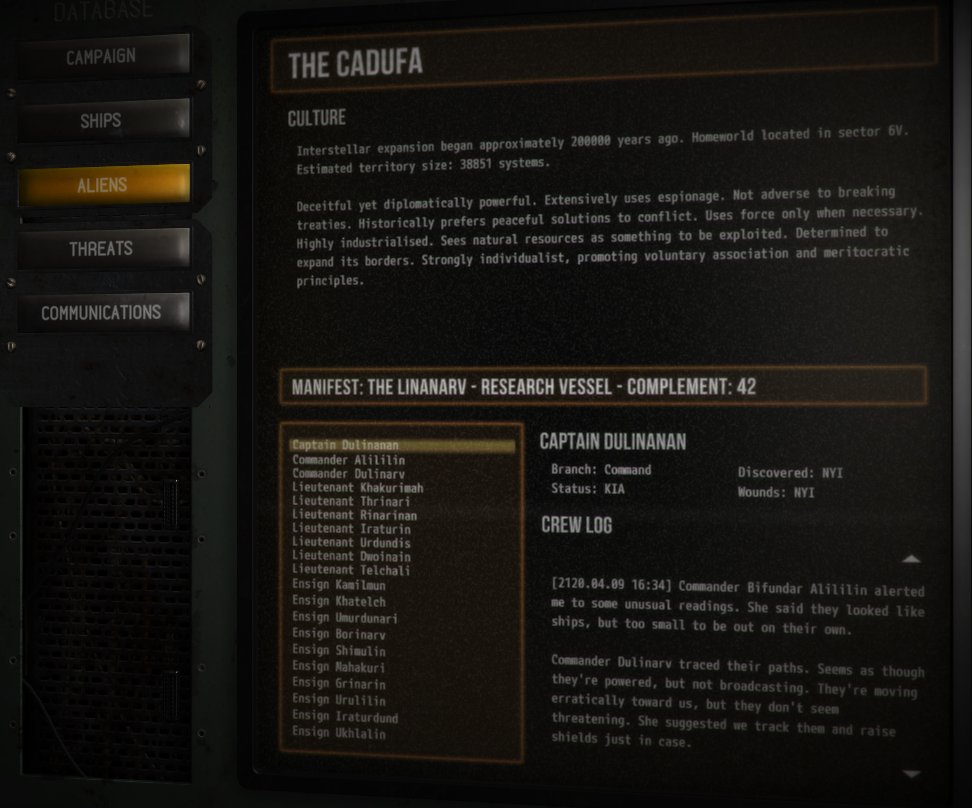
As you complete each of the four missions in the campaign, you'll learn a bit more about what happened. As you examine corpses, you'll find personal crew logs, and maybe even the Captain's log. Logs contain hints, knowledge bonuses, and if your investiation skill is high enough, they can unlock doors, power down sentinels, and more.
All locations are unique, but they all have common properties.

The ships you encounter have all had a rough time. They're unstable, and your presence will only degrade them further. When the ship's integrity has dropped below 10%, it will be destroyed and your crew will be killed.
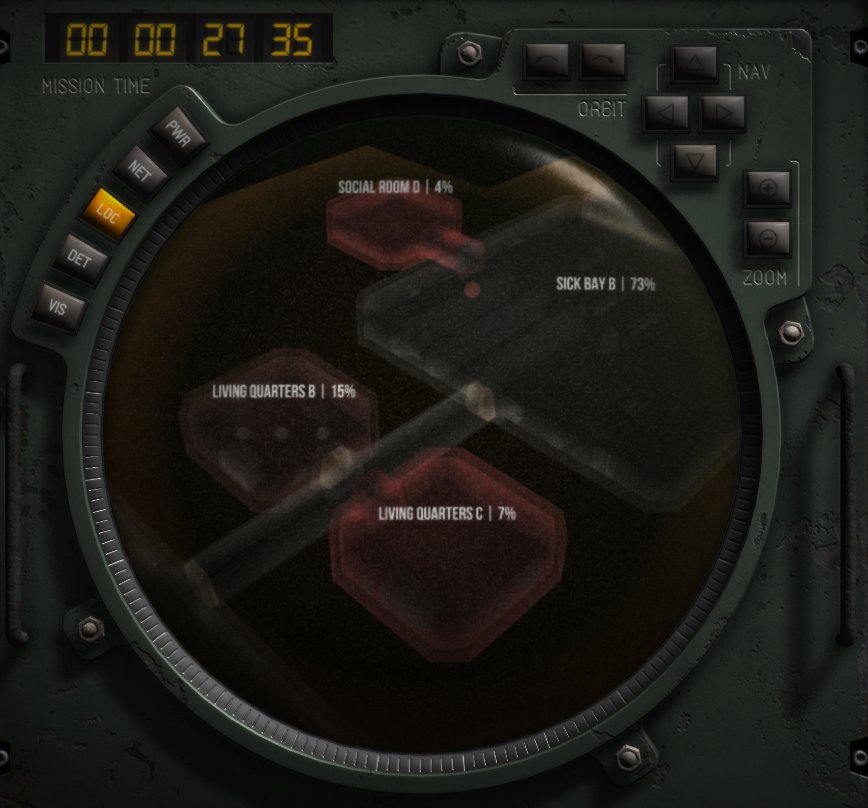
But it's not just the ship's total integrity that matters. If you manage to drop a single room below 10%, any Deadnauts in the room will start receiving structural damage.
Any serious type of destruction, such as using explosive weapons, destroying a Sentinel or blowing up a door will damage a room significantly.
Here, you can see two severely damaged rooms: Living Quarters C and Social Room D. Any Deadnauts - or enemies - in these rooms will take damage. But watch out for Living Quarters B, which is at 15%. A few stray bullets might drop that below 10%.
Note: if a Deadnaut is wearing a shield or receiving a field, then will not receive any damage from low structural integrity.
Every ship distributes power to subsystems in a different way. More power to a subsystem will result in that subsystem becoming more effective.
Most rooms on the ship are connected to a power circuit. The yellow disc on the floor will tell you how much of the ship's current reserve power is flowing into this room.

Every circuit has one power controller. Once you find the room with the controller, you can use it to boost or reduce power to all rooms on that circuit. Note that there is only a fixed power pool on the ship: boosting power on one circuit will decrease it on others.
Your arrival on the ship has awakened the security system. It will not only attack you and other threats, it will also attempt to block any signals going in or out.
The security system isn't fully functional, so it has to distribute power to different security components, making some more effective than others.
Power affects systems in different ways. If Watchers are receiving a lot of power, they'll appear more solid and do more damage to firewalls.
High signal damping will result in stronger glitches if a Watcher sees your Deadnauts.
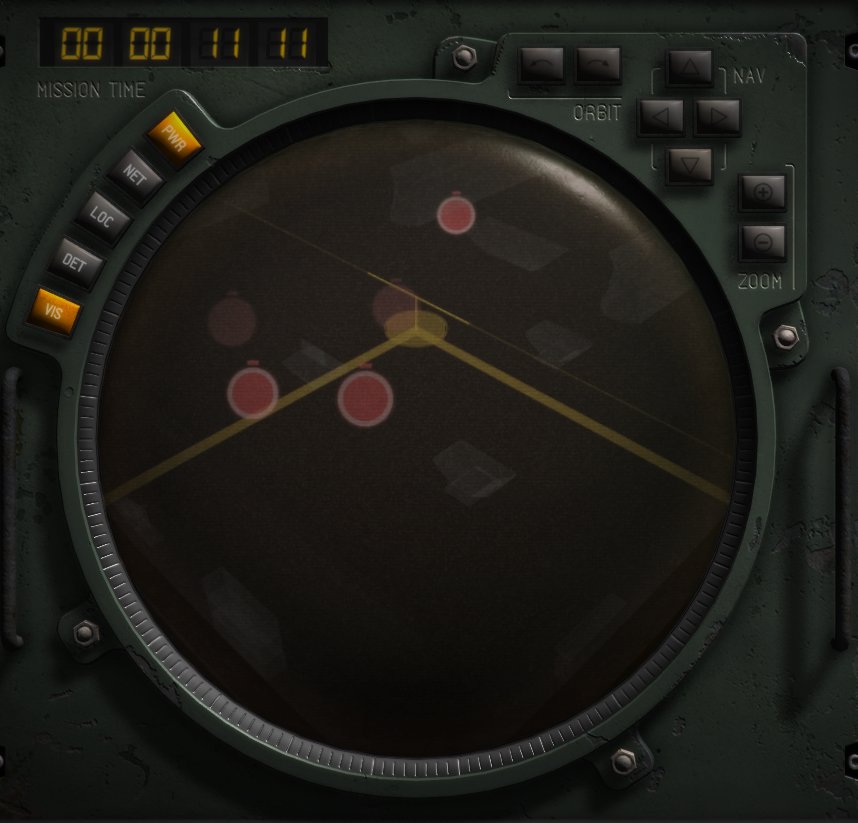
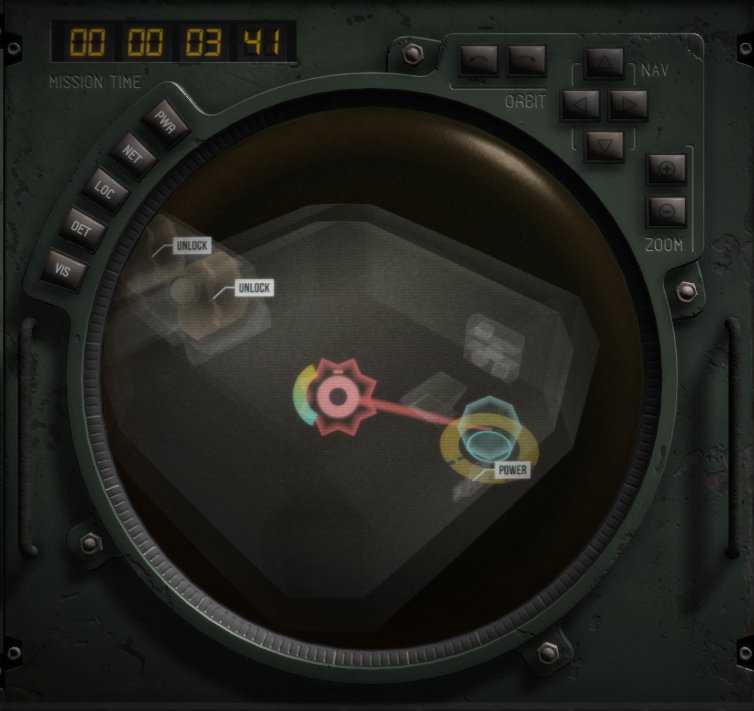
Doors and sentinels are attached directly to the power network and you can see how much power is being diverted to them by turning on the power overlay.
Here, you can see that the line moving from the disc to the door is relatively low.

But if we boost power to the room, the strength will increase. That door will now be relatively harder to open.

Finally, a strong atmosphere will make your enemies tougher on that circuit. The tougher they are, the brighter they'll glow around the edges.
Some ships have special artifacts. For example, you may be fleeing from a seemingly unstoppable enemy when you encounter strange relics in the cargo hold - perhaps the relics are linked to the threat?
Another common sight is a portal. These spawn new threats onto the ship, so you might want to take them out as fast as you can.
All ships contain some kind of hostile threat. You'll never know for sure what you'll be up against, but as you go through the campaign, you might collect some helpful knowledge about what's around the corner.
Every campaign will contain four different threats. The threats get more challenging as you progress through the missions. Although all threat types are individually distinct, they all share certain characteristics that you can exploit.

Every threat has a set of characteristics that can give you hints about how it might behave. These could include one or more of the following:
The more you encounter a threat, the more you'll learn about it. Without this information, you won't know how to kill them.
All enemy types have distinct behaviours. Some will fire weapons and coordinate, others can teleport, some come pouring out of portals - and some can regenerate and come back to life. As you become more familiar with the game, you'll be able to better predict and deal with these characteristics.
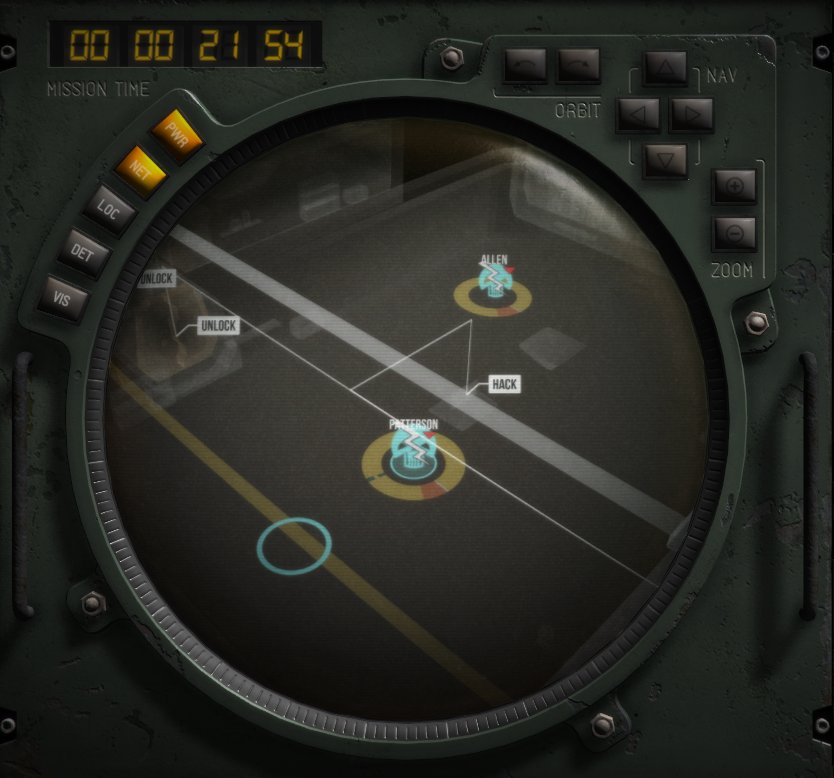
Some enemies can drag a Deadnaut a short distance. This can have dramatic effects because a dragged Deadnaut can't move or attack. It also means that even weak enemies can have a devastating impact on combat.
There are several ways you can deal with dragging:
When a Deadnaut is being dragged, a chain symbol will appear on their icon in the main viewscreen. Here, you can see a Deadnaut about to be dragged out of the room.
The goal of any Deadnaut campaign is to explore the galaxy and send the information back to Earth. In every mission, your Deadnauts will collect units of Knowledge. Some knowledge will be gathered passively - such as walking into a room you've not seen before - while others might result from investigating clues.
Sometimes, gaining new Knowledge will reveal some interesting information in your Library console. For example, you might learn that an enemy you just encountered has a specific vulnerability to beam weapons.
The amount of Knowledge obtained can be increased by the Investigation skill. This can be active, such as using a Deadnaut with a high Investigation score to examine corpses, or passive, such as putting a Deadnaut in the same room as a threat.
Primarily, your Knowledge is a form currency. You can trade it back to Earth, who will offer some new technology in return.

Once you've made a trade and received the schematics, you'll be able to fabricate as many items as you want.
The other important use for Knowledge is cloning. If a Deadnaut is killed - and you have at least one Deadnaut still standing - you can trade some Knowledge and bring the Deadnaut back to life.
Your Deadnauts are nothing without their equipment. There are five types equippable items: suits, primary, sidearm, passive and belt.
Everything depends on the Deadnaut's suit. They provide basic protection, a supply of regenerating power, and they determine what kinds of items can be equipped.

There are four kinds of attachment ports.
When equipping an item, you'll have to make sure you have enough available ports.
A primary item is anything the Deadnaut can actively use, such as a weapon, an active sensor, a hacking tool or a defensive field.
When a primary is used, it often requires active power. It can only be used if the suit's power level can afford the power burst.
All Deadnauts should have a sidearm and all suits have at least one Weapons port to allow for it.
A sidearm is only used if a Deadnaut does not have a primary weapon, or if the Deadnaut is engaged in melee and they have a melee weapon in the sidearm slot. Deadnauts without a melee weapon will be unable to attack when in close-quarters combat.
Passive items are always active and draw baseline passive power from the suit. Passive items typically provide some kind of minor bonus, such as a shield or a passive sensor.
Stimulants can be equipped in one or two belt slots. Stimulants are activated by clicking on them during a mission.
Most equipment requires power to operate. Some require passive power, such as a shield. Passive power is used constantly.
Others, such as active sensors, fields and some weapons, use active power, which eats into the suit's available power when used. This means a Deadnaut may need to wait for their suit to recharge before using their equipment again.
You can influence the recharge rate of your Deadnauts' suits in two ways. First, you can equip a recharger in a passive slot.
Second, you can increase the amount of power flowing into the room. Your Deadnaut will then tap into the power and recharge at a faster rate.
To boost power, first you need to map out the room's power circuit. One of the rooms on the circuit will have a power controller. Boosting this will boost all rooms on the circuit, but be warned: it will decrease the power available on all other circuits.
Remember also that even though you're boosting power to a room, the ship may not be directing a lot of power into the Reserve subsystem, meaning it won't have much of an effect. You can always check the ship's overall power distribution before or during the mission via the Database and the MFD.
Combat is one of Deadnaut's most complex systems. It involves three discrete stages.
Nothing matters if you can't hit the target. There are three things that determine accuracy:
Just because it hit, doesn't mean it made an impact. The amount of penetration is a factor of penetration type versus the target's armour.
The next stage is to determine how much damage it did.
First, we compare the damage type of the attack against the target's resistances.
Second, we factor in the amount of penetration.
The final stage is to check if we should apply a special effect on the target. This is related to the nature of the attack. Note that there is only a small chance of an effect occurring on a given attack.
If a Deadnaut attacks an unaware enemy, then the chance of a special effect increases dramatically.
Tying it all together, here's an example.
Hacking can be a crucial part of any mission. A good hacker can stop Watchers from discovering your Deadnauts, open doors from a distance and even control Sentinels.
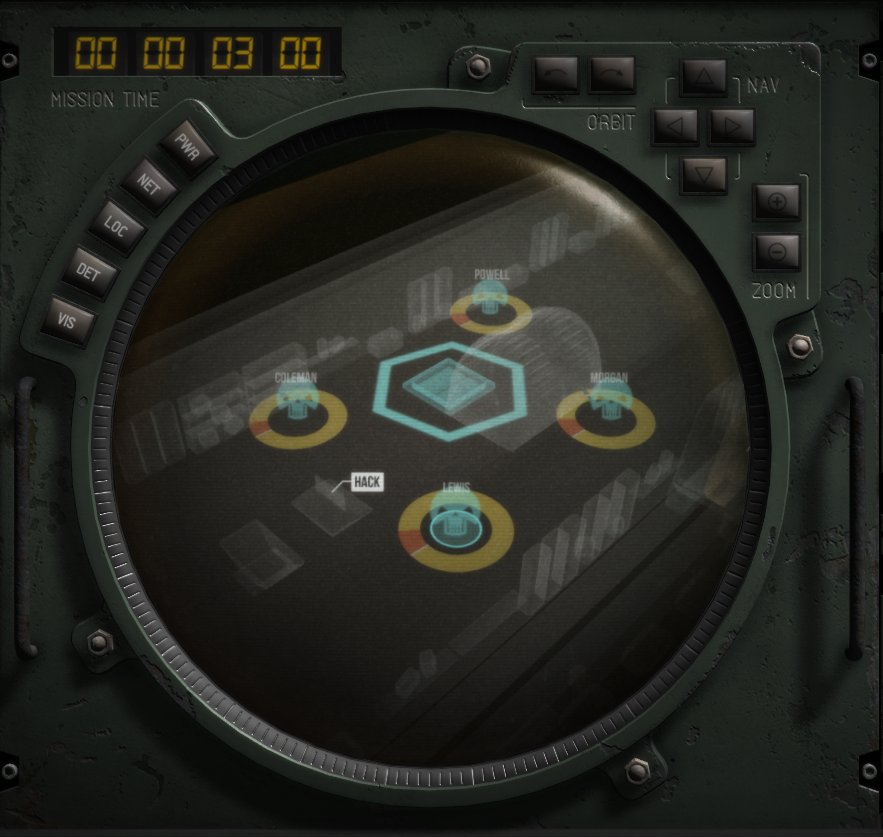
To hack and view the status of Watchers, you'll need to choose a Deadnaut, find a console, and select the 'Hack' option.
The screen will switch to a top-down view of the network. To exit the screen and return to normal, press Escape or click the 'Log off console' button in the Viewport.
There are several things you can hack.
Once you've hacked into a console and found a target, just select it on the network and a blue hack line will move toward it.

You can start multiple hacks, but the time to completion will be distributed among all the active hacks - if you have three hacks going at once, then they'll move at a third of the speed.
You can improve your hacks with a high hacking skill or using different types of equipment:
When you hack an object, such as opening a door or coverting a Sentinel, a portion of the sub-network line will turn blue and a marker will be placed at the end. When a Watcher tries to reset the hack, it must first push back the blue line - the longer the line, then the longer it will take the Watchers to reset it.
A good hacker and/or superior scrambling tools will create a longer line.
If a Watcher hits a hack in progress, it will stop the hack.
If a Watcher discovers evidence of a hack - say, an opened door or a hacked sentinel - it will try to revert them back to their original state by releasing smaller Watchers on the sub-network lines.
When the smaller Watchers encounter a blue line, they will push it back slightly. Once they've pushed it all the way back, the hack will revert.

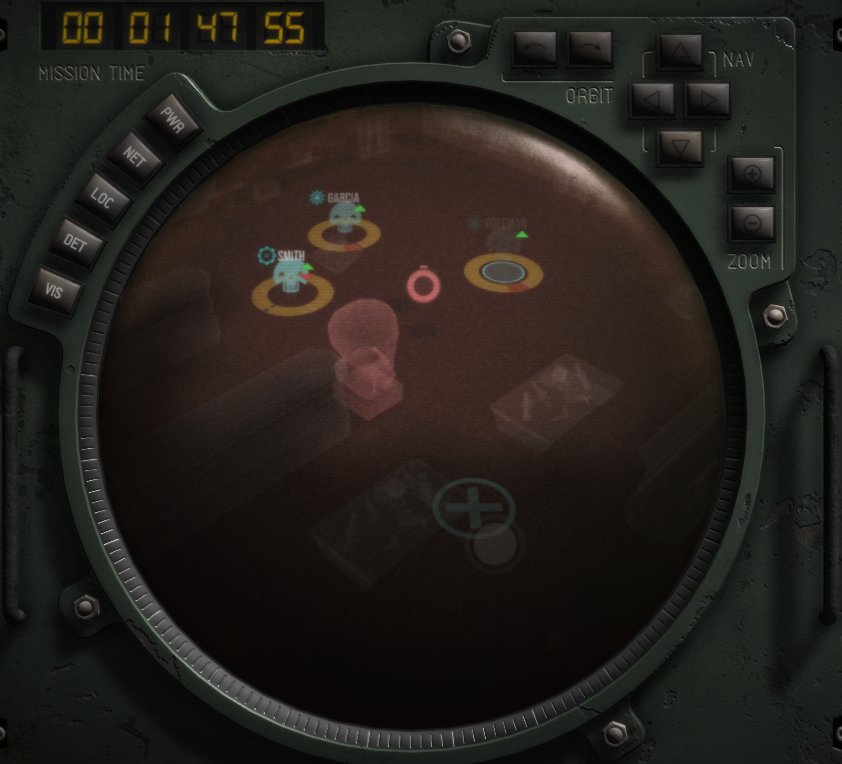
The biggest threat that Watchers pose to your Deadnauts is that they disrupt the signals going between you and your Deadnauts.
This happens in three ways.
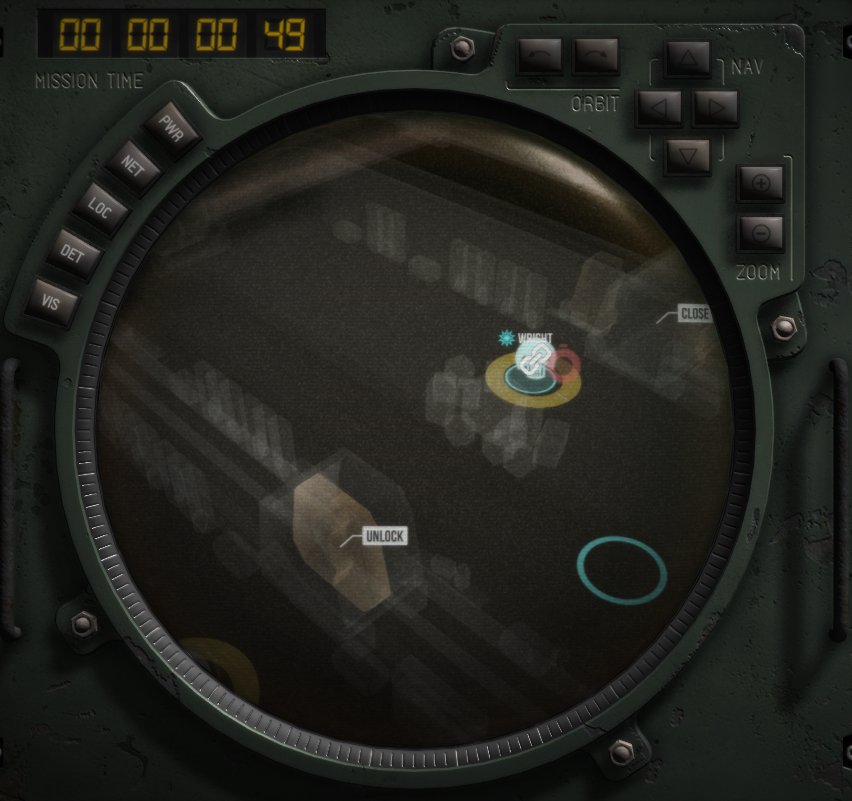
You can attempt to boost a signal type, which will alleviate some of the effect. But the best way to combat glitching is to stop it from happening in the first place by avoiding Watchers.
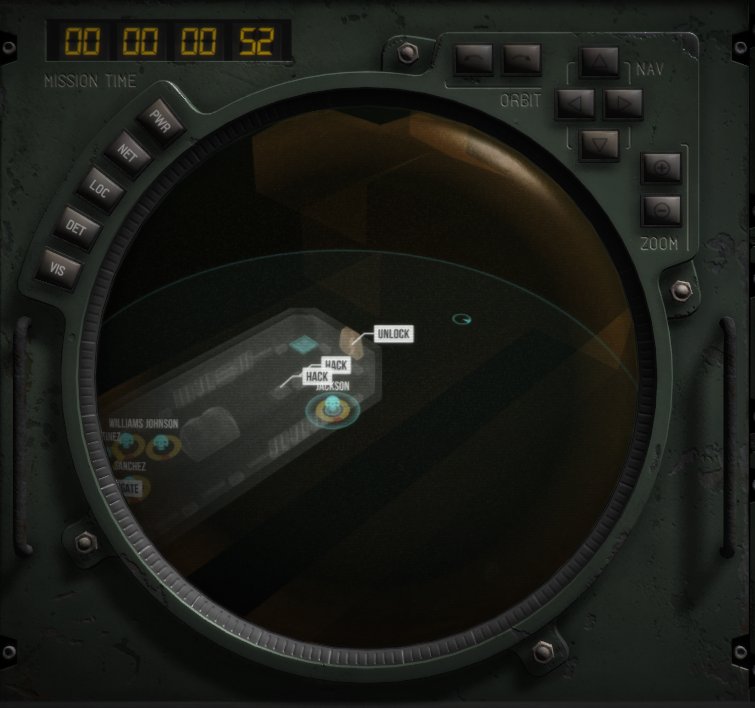
The image below shows two Deadnauts that won't receive orders because there's too much interference on the Audio channel.
All ships contain clues. Most clues look like blinking dots on the floor (usually a corpse) or on a piece of furniture. To investigate the clue, select a Deadnaut and click 'Investigate'.
Clues will typically provide you with Knowledge, but some can also reveal undiscovered rooms, unlock doors, or provide information about the threats you're facing. The higher the Deadnaut's Investigation skill, the more likely they are to reveal some special information.
Once a clue is investigated, it will disappear. So try and use your best investigator.
Intuition is a mysterious skill. It's not well understood, but intuitive Deadnauts can instantly reveal hidden enemies, sentinels and distant rooms.
Most importantly, they're more likely to reveal escape hatches. This can be the difference between life and death, so it's a good idea to have at least one intuitive Deadnaut in the squad.
Every entity on the ship - including your Deadnauts - can be detected using a number of methods.
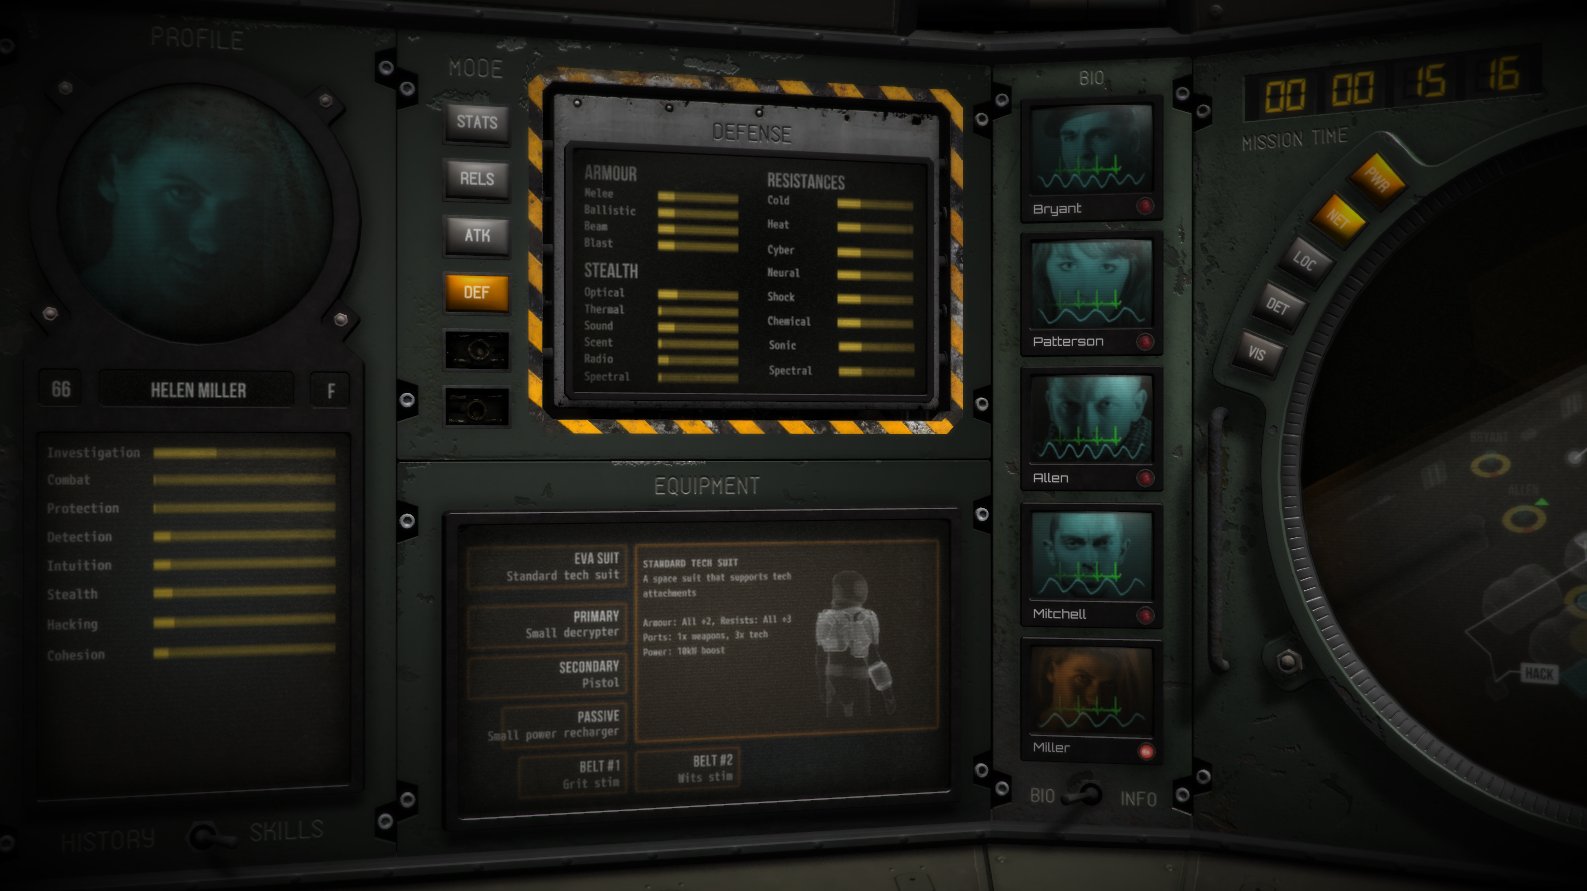
To see how visible you are, check your stealth profile on the Crew console in the DEF mode. Similarly, you can check the stealth profile of any threats you discover via the Library console - provided you've discovered it.
Stealth and detection go hand-in-hand. Once you know an enemy's stealth profile, you can equip your Deadnauts with sensors that allow you to detect it faster.
Similarly, you can also invest in cloaks. These are similar to sensors, but they have the opposite effect: a Deadnaut's stealth profile will be diminished, making them harder to spot.
IMPORTANT: The higher the stealth bar, the more detectable the entity is. For example, if you encounter a threat with a low thermal bar, then it will be harder to detect. You will be able to detect it better if you have a high thermal sensor.
Some sensors can be equipped in a Deadnaut's primary slot. You can then select your Deadnaut and order a special action.
This will 'throw' the sensor to another location, revealing anything inside - assuming the sensor is able to detect it.
Sensors equipped in the passive slot will periodically emit a sensor pulse that radiates from the Deadnaut.
A cloak reduces a Deadnaut's stealth profile, making them harder to detect by enemies. This has the obvious benefit of making your Deadnauts safer - an unaware enemy won't attack. But attacking an unaware enemy can also increase the chances that your Deadnaut will perform a special damage effect (eg, slow, stun, confusion).
The best way to protect your Deadnauts is to equip them with shields. Shields can provide the following benefits:
Of course, you'll need to have defense ports on your suit and a spare passive slot, which limits who can carry shields. The answer is to equip one of your Deadnauts with a field, which will 'throw' a shield onto another Deadnaut, provided that Deadnaut is in range and in line-of-sight.
To project a field, select a Deadnaut with a field in their primary suit slot and then middle-click on another Deadnaut. Alternatively, hold down Control and left-click.
Shields and fields stack, meaning you can throw a field onto a Deadnaut who already has a shield for an extra bonus.

Note that fields use the suit's active power when activated.
Some threats will try and drag your Deadnauts away from the group, which can have a devastating effect. Any Deadnaut with a shield or field will never be dragged - you can also cast a field onto a Deadnaut to cancel a drag in progress.
In addition, you can also throw a field onto an enemy. This has several effects:
Although fields rely on timing and reflexes, they can be very powerful and are worth taking the time to master.
If a room's structural integrity drops below 10%, Deadnauts will start taking damage in that room. A shield or field will block all room damage of this type.
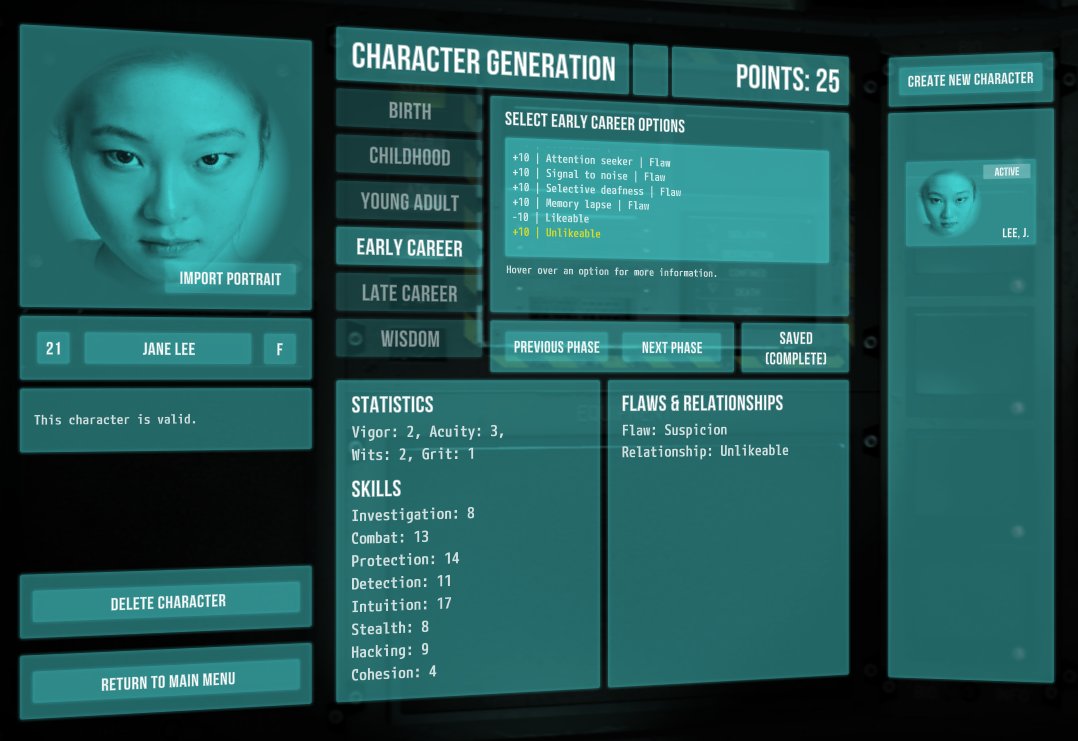
Starting a new game will always give a capable crew to play with, but if you want more control over your Deadnauts, you can always try to craft the perfect crew.
To start creating Deadnauts, click the Crew Roster button on the main menu screen.

Your character is now complete. Note that some elements of your character will be assigned when the game starts, such as relationships.
By default, all new Deadnauts created will be 'active'. An active Deadnaut means they will always appear in your crew when you start a new campaign.
If you have fewer than 5 active Deadnauts, new Deadnauts will be generated for you. If you have more than 5 active Deadnauts, then 5 will be randomly selected from your active list.
You must complete four missions. Your objective for the current mission is listed on the MFD in the top-right on the MIS tab. Once you've completed the objective, move your Deadnauts to an evacuation point.
Maybe. Intuitive Deadnauts may reveal more convenient evac points.
You can lose in two ways: your Deadnauts are wiped out by threats or sentinels, or the ship they're aboard takes too much damage and explodes.
There are no perfect Deadnauts. Every skilled Deadnaut must have a downside - perhaps they're unlikeable, maybe they have some kind of flaw.
It depends on the enemy you're facing and the location. Check the mission briefing and the Library console before you equip your Deadnauts.
Every ship has Watchers that roam around looking for threats. If they spot your Deadnauts, they'll try to disrupt the signals they're sending and receiving.
Watchers can't be killed. The only way to stop them is to find a security console, hack into it, and place a firewall to temporarily block it.
Watchers will look for any signs of hacking and try to correct them.
Many actions require power. Your Deadnauts' suits provide a lot of power, but they need to recharge. Fortunately, they can tap into the ship's reserve power that flows into the room.
A Deadnaut with a pesonal shield or a field thrown on them will never get dragged. If they do get dragged, Deadnauts with melee weapons or high grit may break free sooner.
All rooms are connected to a circuit. One of the rooms on the circuit will have a power controller that your Deadnauts can use to boost or lower power. Remember: boosting power to one circuit will lower the power on other circuits.
Check the ship's power profile on the MFD. If the ship isn't diverting a lot of power to the reserve system, then there won't be a large reservoir for your Deadnauts to draw power from.
Whenever your Deadnauts discover something new, your Knowledge will increase. This can happen when you enter a new room, investigate a corpse, or learn something about an enemy.
You trade your Knowledge for technology with Earth via the Communications screen on the Library console. The more Knowledge you have, the more technology you can purchase.
Try and figure out what might help you defeat your enemies. Does it have any specific weaknesses you could exploit?
If all your Deadnauts die, the game is lost forever. There is no reloading.
Not necessarily. If you have at least one Deadnaut remaining at the end of a mission, you can spend some of your Knowledge to create clones of your deceased Deadnauts. However, the cloning process isn't perfect: your clone may have lost skills... or perhaps gained some.
Concept, design and code: David Kidd and Logan Booker
Art: Gavin Jenkins and Sayantan Chaudhuri
Additional:
Screwfly Studios is David Kidd and Logan Booker. We create deep, innovative strategy games for PC. Deadnaut is our second game. Our first was the cult classic, Zafehouse: Diaries.
You can contact us at contact@screwflystudios.com.